
- begin
- how it works
- results
- online store
- EarBuddies®
- extra headwear
- adhesive tapes
- adhesive remover
- barrier film & cream
- fitting
- professionals
- help
- Sign in
-

-

Fitting Guide
Before you start
Read the pages under the 'How it Works' menu on the website - this is full of useful information about Early Ear Correction™ and will give you a good base knowledge on splintage. For further information, the FAQs page provides the answers to some interesting questions raised by parents who have previously fitted EarBuddies™.

Take your Time
We understand that having a new baby in the house is stressful, so take your time to read through the instructions fully, at least once, before you begin.

Maintain Hygiene
We stress the importance of proper hygiene throughout the duration of the splintage process. Before you fit the splints, and every time you change the tapes, it is of paramount importance to thoroughly wash your hands with soap. Improper hygiene may result in infection.

When to Fit
Parents report that it is easier to fit when baby is sleeping or feeding, and that fitting earlier in the day is preferable.
You will need:
- Your EarBuddies Premium Pack or Basic Kit.
- A pair of child-friendly safety scissors.
- Some toys and books as a distraction (if baby is awake), and a helper if available.
- A little dexterity and some patience, particularly if your baby is more than two weeks old, when they begin to be more active.
Click here if you would prefer to print your instructions, though it is worth bearing in mind that the online instructions contain additional content.
Step 1 - Shave a little hair
- Click here to see the operating instructions for the Wahl™ Shaver included in our Premium Packs.
- Shave the hair, no matter how fine, in the area where the tapes will stick for a firm, comfortable and trouble-free fix. This is especially important for babies older than one month, who have more hair than newborns.
- Shaving a little hair around the ears will do your baby no harm - remember: hair grows back quickly, but prominent or deformed ears are permanent if not corrected.


Step 2 - Bathing
Give baby a bath with particular focus on degreasing the ears. Using gentle baby soap, roll the ears between your fingers to ensure they are thoroughly clean, paying particular attention to the folds and creases. Let baby play in the bath to give the soap time to work, then gently rub the ears again with your fingers. Rinse off and dry the ears, rubbing gently with a clean soft towel. Let your baby’s ears dry for AT LEAST 90 minutes before fitting the splints.
Step 3 - Cavilon™ Barrier Film (optional)
Cavilon No Sting Barrier Film is used to prevent skin inflammation beneath the EarBuddies splint, behind the ear and beneath the adhesive tapes. The adhesive tapes can be applied on top of this film, once it has dried. Click here for more information on Cavilon.
If your baby's skin is sensitive, you live in a humid country, your baby is older than 1 month or you have difficulty keeping the tapes dry, then Cavilon is strongly recommended. If this is your first fitting, and you aren't aware that your baby's skin is particularly sensitive, we would still recommend applying Cavilon before you begin, as a moisture barrier. If your baby is under 1 month of age, the need for Cavilon is less.
- Skin should be clean and dry prior to application of Cavilon.
- Hold spray nozzle 10-15 centimetres from skin and apply a smooth, uniform coating of film over the entire area behind the ear and the areas that will be in contact with the splints and adhesive tapes.
- If an area is missed, reapply to that area only after the first application of Cavilon has dried (approximately 30 seconds).
- Where there is skin-to-skin contact, such as the crease behind the ear, make sure that these skin-to-skin contact areas are separated to allow the film to thoroughly dry.
- Allow Cavilon to dry fully before applying adhesive tapes. Re-application of Cavilon is necessary each time the adhesive tapes are changed as the barrier film is removed by the adhesive.
- Cavilon will wear off naturally, but if you wish to remove the barrier film, you can use a medical adhesive remover (such as Appeel®).

Step 4 - Prepare the Narrow Tapes
(CRYPTOTIA ONLY: If you are fitting EarBuddies to treat Cryptotia, you should ignore Step 4)

Click image to expand
- Open the pack of narrow adhesive tapes and cut the tapes into thirds.
- You will need at least 4 pieces (thirds) of tape to hold each splint in place.
- Leave the backing on until you are ready to use each piece of tape.

Sticking the pre-cut tapes to the backing is a useful trick
Step 5 - Put splints in place and fix with Narrow Tapes
Select which condition you are treating:
- Stick-Out Ears
- Stahl's Bar
- Cup Ear
- Cryptotia
- Lop Ear
- Rim Kink
- Folded-Over Helical Rim
- Stick-Out Lobe
- Conchal Crus
-
Fitting Instructions for treating Stick-Out Ears
- Your pack contains two splints - one for each ear; there is no need to fit a splint to both ears if only one is misshapen or sticks out.
- The splints should be manipulated to the required shape. The splints need to fit snugly inside the helical rim, so checking and adapting the shape of each splint to fit the scaphal hollow of your baby's ears is essential.

See Figure A - Apply the splint to the scaphal hollow (A1), inside the rim (helix) (A2) of the ear, starting just above the triangular fossa (A3), and working backwards. Hold the splint in position.

See Figure B - Remove one narrow tape strip from its backing. Starting from the back of the ear at the middle of its curve (position B1), stick it down over the skin and the splint so that the rim of the ear is rolled over the splint. Affix three more pieces of narrow tape in the same way in positions B2, B3 and B4.
When the splint is held in place with the narrow tapes, it is often possible to gently manipulate the ear and the splint together, to refine the shape. Once the splint is in position, and the ear taped back against the side of the head (Step 6), the splint will reshape the antihelix and maintain the curve of the helical rim.
Step 6 - Use Wide or SuperWide tape to hold the ear to the side of the head
- Open the pack containing the Wide or SuperWide adhesive tapes.
- If using the SuperWide tapes, you may wish to shorten them by up to 3 cm. Although shortening the tapes will give less adhesion, it will make them less conspicuous. You may be able to cut the excess SuperWide tape ends into narrow tapes to hold the splint in place next time you change the tapes.


3. Rounding the tape ends with scissors before you remove them from their backing and apply them can help to prevent the edges from lifting and improve their appearance.
4. Use one Wide or SuperWide tape to hold the splinted ear firmly to the side of the head as shown in the picture below. Use Wide tape if your baby is under 1 month of age. Use SuperWide tape if your baby is older than this, because the cartilage is stiffer and the ears are larger. The greater surface area of SuperWide tape also helps the tapes to stay in place as older babies have greasier skin, sweat more and are more active.
5. If you are using SuperWide tape, you might find it helpful to put an additional strip of Wide tape at the top of the ear to close off the groove between the ear and the side of the head (as shown in the picture) to discourage any ear tugging, for example, during teething.
6. Do not apply the adhesive tapes under tension or stretched; excessive tension may cause the delicate skin to shear or blister.

See examples below of fitting EarBuddies to treat Stick-Out Ear.


-
Fitting Instructions for treating a Stahl's Bar
- Your pack contains two splints - one for each ear; there is no need to fit a splint to both ears if only one is misshapen or sticks out.
- The splints should be manipulated to the required shape. The splints need to fit snugly inside the helical rim, so checking and adapting the shape of each splint to fit the scaphal hollow of your baby's ears is essential.


See Figure A - Apply the splint to the scaphal hollow (A1), inside the rim (helix) (A2) of the ear, starting just above the triangular fossa (A3), and working backwards. Hold the splint in position.

See Figure B - Remove one narrow tape strip from its backing. Starting from the back of the ear at the middle of its curve (position B1), stick it down over the skin and the splint so that the rim of the ear is rolled over the splint. Affix several more pieces of narrow tape in the same way in positions B2, B3 and B4 as above.
When the splint is held in place with the narrow tapes, it is often possible to gently manipulate the ear and the splint together, to refine the shape. Once the splint is in position, and the ear taped back against the side of the head (Step 6), the splint will reshape the antihelix and maintain the curve of the helical rim.
Step 6 - Use Wide or SuperWide tape to hold the ear to the side of the head
- Open the pack containing the Wide or SuperWide adhesive tapes.
- If using the SuperWide Tapes, you may wish to shorten them by up to 3 cm. Although shortening the tapes will give less adhesion, it will make them less conspicuous. You may be able to cut the excess SuperWide tape ends into narrow tapes to hold the splint in place next time you change the tapes.

3. Rounding the tape ends with scissors before you remove them from their backing and apply them can help to prevent the edges from lifting and improve their appearance.
4. Use one Wide or SuperWide tape to hold the splinted ear firmly to the side of the head as shown in the picture below. Use Wide tape if your baby is under 1 month of age. Use SuperWide tape if your baby is older than this, because the cartilage is stiffer and the ears are larger. The greater surface area of SuperWide tape also helps the tapes to stay in place as older babies have greasier skin, sweat more and are more active. Ensure the Stahl’s Bar is entirely beneath the Wide or SuperWide tape in order to provide sufficient pressure on the splint to ‘push out’ the deformity.
5. If you are using SuperWide tape, you might find it helpful to put an additional strip of Wide tape at the top of the ear to close off the groove between the ear and the side of the head (as shown in the picture) to discourage any ear tugging, for example, during teething.
6. Do not apply the adhesive tapes under tension or stretched; excessive tension may cause the delicate skin to shear or blister.
See examples below of fitting EarBuddies to treat Stahl's Bar.


-
Fitting Instructions for treating a Cup Ear
In a cup ear, the rim tissue is constricted (too tight) and will not allow the ear to sit back against the side of the head. You are aiming to gently stretch the cartilage over the course of the splintage period. Extra persistence is usually required and it is particularly useful to have a helper and to start splintage as early as possible.
- Your pack contains two splints - one for each ear; there is no need to fit a splint to both ears if only one is misshapen or sticks out.
- The splints should be manipulated to the required shape. The splints need to fit snugly inside the helical rim, so checking and adapting the shape of each splint to fit the scaphal hollow of your baby's ears is essential. When correcting Cup Ear, it is important to shape the splint to mould the ear into a normal shape, and not just to follow the existing curvature of the Cup Ear.
- Do your best to push the splint up under the rim to expand and stretch the ear a little more each time you change the tapes.
We would recommend adjusting the position of the splint and re-taping more frequently to treat Cup Ear in comparison to other conditions. Weekly adjustments to the position of the splint will increase the rate of improvement (although you will consume more tape supplies, so order in advance if you are running low). The ear’s shape should improve throughout the splintage period. While the first application may be tricky, subsequent applications of the splint should be easier as the shape of the ear slowly improves.

See Figure A - Apply the splint to the scaphal hollow (A1), inside the rim (helix) (A2) of the ear, starting just above the triangular fossa (A3), and working backwards. Hold the splint in position.

See Figure B - Remove one narrow tape strip from its backing. Starting from the back of the ear at the middle of its curve (position B1), stick it down over the skin and the splint so that the rim of the ear is rolled over the splint. Affix several more pieces of narrow tape in the same way in positions B2, B3 and B4 as above.
When the splint is held in place with the narrow tapes, it is often possible to gently manipulate the ear and the splint together, to refine the shape. Once the splint is in position, and the ear taped back against the side of the head (Step 6), the splint will reshape the antihelix and maintain the curve of the helical rim.
Step 6 - Use SuperWide tape to hold the ear to the side of the head.
1. When treating Cup Ear, SuperWide tape is always preferable, regardless of the age of the baby, as it is better able to stretch the cartilage to a normal position. The greater surface area of SuperWide tape also helps the tapes to stay in place in older babies, who have greasier skin, sweat more and are more active.
2. Open the pack containing the SuperWide adhesive tapes.
3. You may wish to shorten the SuperWide tapes by up to 3 cm. Although shortening the tapes will give less adhesion, it will make them less conspicuous. You may be able to cut the excess SuperWide tape ends into narrow tapes to hold the splint in place next time you change the tapes.
4. Rounding the tape ends with scissors before you remove them from their backing and apply them can help to prevent the edges from lifting and improve their appearance.
5. Use one SuperWide tape to hold the upper pole of the splinted ear firmly to the side of the head as shown in the picture below.
6. If your baby is older than 1 month, you might find it helpful to put an additional strip of Wide tape at the top of the ear to close off the groove between the ear and the side of the head to discourage any ear tugging, for example, during teething.
7. Do not apply the adhesive tapes under tension or stretched; excessive tension may cause the delicate skin to shear or blister.
See examples below of fitting EarBuddies to treat Cup Ear.


-
Fitting Instructions for treating Cryptotia
- For at least 1 day before the splints are fitted, regularly manipulate the upper pole of the ear to release the hidden part from the head. By pulling the tethered part away from the side of the head with your fingers, gently but firmly, fibrous connections are broken and the skin is slowly stretched. With each manipulation, the hidden upper pole of the ear will become progressively more apparent, giving the ear a better shape. There is no fixed rule for how often or how long to do this for, but as a guide, you could manipulate the ear once per hour for every hour that baby is awake, for approximately 30 seconds at a time.
- Your pack contains two splints - one for each ear; there is no need to fit a splint to both ears if only one is misshapen.


- The splints should be manipulated to the required shape. The splints need to fit snugly into the post-auricular groove (the gap between the ear and the side of the head that is present in a normal ear), so checking and adapting the shape of each splint to fit your baby’s ears is essential. When splinting to treat cryptotia, the role of the splint is both to prevent the upper pole of the ear from retreating beneath the skin of the scalp and to deepen the post-auricular groove, so that the correction becomes permanent.
- When you are ready to fit the splint, pull firmly at the cartilage framework of the upper pole of the ear to release the hidden part that is tethered to the side of the head. Insert the splint into the post-auricular groove.
- Use Wide Tape to hold the splint in position in the post-auricular groove (above and behind the upper pole of the ear). You can place Narrow Tapes across the ends of the Wide Tapes to help prevent the tapes ends from lifting.
- Adjust the position of the splint regularly (we suggest approximately every 72 hours) to increase the depth of the post-auricular groove. At each adjustment, before you refit the splint, repeat the manipulation as before, to further release the tethered part. Then pull the upper pole of the ear out from the side of the head and push the splint further into the post-auricular groove, then tape in position.
- Do not apply the adhesive tapes under excessive tension; too much tension may cause the delicate skin to shear or blister.


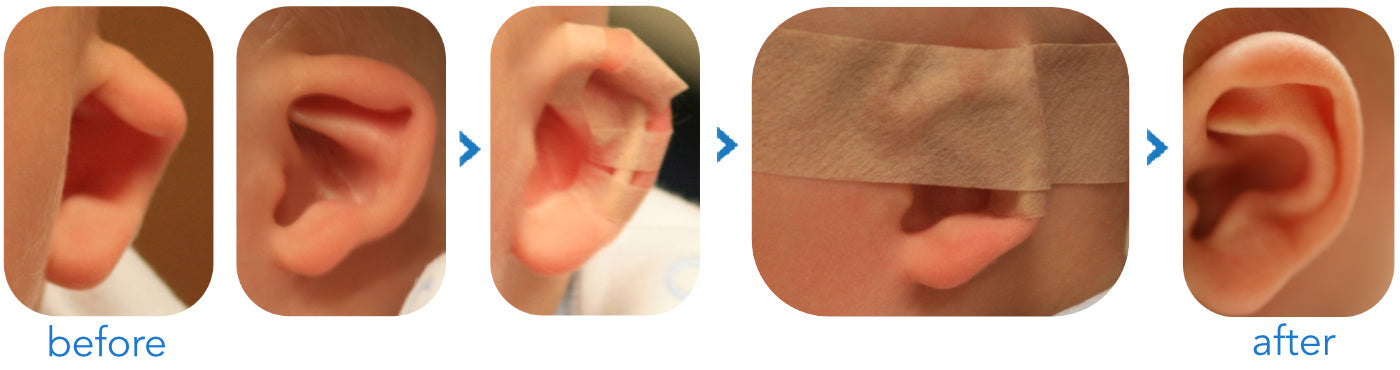
before EarBuddies fitting

fix the splint in place with adhesive tape

after EarBuddies
Images are drawn and supplied by David Gault FRCS at EAR (Ear Aesthetics & Reconstruction). Images adapted by EarBuddies™.


- Rounding the tape ends with scissors before you remove them from their backing and apply them can help to prevent the edges from lifting and improve their appearance.
(There is no Step 6 when fitting EarBuddies to treat Cryptotia - proceed to Step 7.)
-
Fitting Instructions for treating a Lop Ear
To treat Lop Ear, lift up the lopped-over section and use the splint to hold the ear in a ’normal’ shape. When treating Lop Ear, you may find an extra pair of hands especially useful to hold the splint in position.- Your pack contains two splints - one for each ear; there is no need to fit a splint to both ears if only one is misshapen or sticks out.
- The splints should be manipulated to the required shape. The splints need to fit snugly inside the helical rim, so checking and adapting the shape of each splint to fit the scaphal hollow of your baby’s ears is essential.

See Figure A - Hold the lower end of the splint. The splint should be used to lift up the lopped-over part of the ear and hold the ear in a ’normal’ shape, in preparation for applying the narrow tapes. The splint will sit in the scaphal hollow (A1), inside the rim (helix) (A2) of the ear, beginning just above the triangular fossa (A3). Hold the splint in position.

See Figure B - Remove one narrow tape strip from its backing. Apply the first tape to the bottom of the splint (position B4) to hold the splint in the correct position. Starting from the back of the ear, stick the tape over the skin and the splint. Apply the second tape in position B3 to further secure the splint. Affix the third piece of narrow tape in the same way in position B2. Finally, affix one more piece of tape in position(s) B1 - stick the narrow tape down over the skin and the splint so that the rim of the ear is rolled over the splint (you can apply more than one narrow tape to this part of the ear if you wish).
The diagrams below explains this process step by step:
Images are drawn and supplied by David Gault FRCS at EAR (Ear Aesthetics & Reconstruction). Images adapted by EarBuddies.

Lop Ear before splintage.

Use the splint to lift up the lopped-over part of the ear.

Hold splint in place.

Apply the first tape in position B4 to hold the splint in place.

Apply the second tape in position B3 to further secure the splint.

Apply the third tape in position B2 to hold the top of the splint in place.

Apply the fourth tape in position B1 - you can apply additional narrow tapes if you wish.

Lop Ear after splintage.
When the splint is held in place with the narrow tapes, it is often possible to gently manipulate the ear and the splint together, to refine the shape. Once the splint is in position, and the ear taped back against the side of the head (Step 6), the splint will reshape the antihelix and maintain the curve of the helical rim.
Step 6 - Use Wide or SuperWide tape to hold the ear to the side of the head
- Open the pack containing the Wide or SuperWide adhesive tapes.
- If using the SuperWide Tapes, you may wish to shorten them by up to 3 cm. Although shortening the tapes will give less adhesion, it will make them less conspicuous. You may be able to cut the excess SuperWide tape ends into narrow tapes to hold the splint in place next time you change the tapes.
3. Rounding the tape ends with scissors before you remove them from their backing and apply them can help to prevent the edges from lifting and improve their appearance.
4. Use one Wide or SuperWide tape to hold the splinted ear firmly to the side of the head as shown in the picture below. Use Wide tape if your baby is under 1 month of age. Use SuperWide tape if your baby is older than this, because the cartilage is stiffer and the ears are larger. The greater surface area of SuperWide tape also helps the tapes to stay in place as older babies have greasier skin, sweat more and are more active.
5. If you are using SuperWide tape, you might find it helpful to put an additional strip of Wide tape at the top of the ear to close off the groove between the ear and the side of the head (as shown in the picture) to discourage any ear tugging, for example, during teething.
6. Do not apply the adhesive tapes under tension or stretched; excessive tension may cause the delicate skin to shear or blister.
See examples below of fitting EarBuddies to treat Lop Ear.


-
Fitting Instructions for treating a Rim Kink
- Your pack contains two splints - one for each ear; there is no need to fit a splint to both ears if only one is misshapen or sticks out.
- The splints should be manipulated to the required shape. The splints need to fit snugly inside the helical rim, so checking and adapting the shape of each splint to fit the scaphal hollow of your baby's ears is essential.

See Figure A - Apply the splint to the scaphal hollow (A1), inside the rim (helix) (A2) of the ear, starting just above the triangular fossa (A3), and working backwards. Use the splint to push the Rim Kink up and out. Hold the splint in position before fixing in place.

See Figure B - Remove one narrow tape strip from its backing. Starting from the back of the ear at the middle of its curve (position B1), stick it down over the skin and the splint so that the rim of the ear is rolled over the splint. Affix three more pieces of narrow tape in the same way in positions B2, B3 and B4.
When the splint is held in place with the narrow tapes, it is often possible to gently manipulate the ear and the splint together, to refine the shape. Once the splint is in position, and the ear taped back against the side of the head (Step 6), the splint will reshape the antihelix and maintain the curve of the helical rim.
Step 6 - Use Wide or SuperWide tape to hold the ear to the side of the head
- Open the pack containing the Wide or SuperWide adhesive tapes.
- If using the SuperWide Tapes, you may wish to shorten them by up to 3 cm. Although shortening the tapes will give less adhesion, it will make them less conspicuous. You may be able to cut the excess SuperWide tape ends into narrow tapes to hold the splint in place next time you change the tapes.
3. Rounding the tape ends with scissors before you remove them from their backing and apply them can help to prevent the edges from lifting and improve their appearance.
4. Use one Wide or SuperWide tape to hold the splinted ear firmly to the side of the head as shown in the picture below. Use Wide tape if your baby is under 1 month of age. Use SuperWide tape if your baby is older than this, because the cartilage is stiffer and the ears are larger. The greater surface area of SuperWide tape also helps the tapes to stay in place as older babies have greasier skin, sweat more and are more active.
5. If you are using SuperWide tape, you might find it helpful to put an additional strip of Wide tape at the top of the ear to close off the groove between the ear and the side of the head (as shown in the picture) to discourage any ear tugging, for example, during teething.
6. Do not apply the adhesive tapes under tension or stretched; excessive tension may cause the delicate skin to shear or blister.
See example below of fitting EarBuddies to treat Rim Kink.

-
Fitting Instructions for treating a Folded-Over Helical Rim
- Your pack contains two splints - one for each ear; there is no need to fit a splint to both ears if only one is misshapen or sticks out.
- The splints should be manipulated to the required shape. The splints need to fit snugly inside the helical rim, so checking and adapting the shape of each splint to fit the scaphal hollow of your baby's ears is essential.

See Figure A - Apply the splint to the scaphal hollow (A1), inside the rim (helix) (A2) of the ear, starting just above the triangular fossa (A3), and working backwards. Use the splint to push the folded-over rim up and out so that it forms a smooth curve. Hold the splint in position.

See Figure B - Remove one narrow tape strip from its backing. Starting from the back of the ear at the middle of its curve (position B1), stick it down over the skin and the splint so that the rim of the ear is rolled over the splint. Affix three more pieces of narrow tape in the same way in positions B2, B3 and B4.
When the splint is held in place with the narrow tapes, it is often possible to gently manipulate the ear and the splint together, to refine the shape. Once the splint is in position, and the ear taped back against the side of the head (Step 6), the splint will reshape the antihelix and maintain the curve of the helical rim.
In some cases, the folded-over rim is fused and there is no separation between the two leaves of cartilage, closing out the scaphal hollow. Do your best to push the splint between the leaves of cartilage to create a recess and open out the scaphal hollow. In such instances, if you are struggling to make sufficient improvements after a week or two, it would be prudent to consult an EarBuddies Professional.

Step 6 - Use Wide or SuperWide tape to hold the ear to the side of the head
- Open the pack containing the Wide or SuperWide adhesive tapes.
- If using the SuperWide Tapes, you may wish to shorten them by up to 3 cm. Although shortening the tapes will give less adhesion, it will make them less conspicuous. You may be able to cut the excess SuperWide tape ends into narrow tapes to hold the splint in place next time you change the tapes.
3. Rounding the tape ends with scissors before you remove them from their backing and apply them can help to prevent the edges from lifting and improve their appearance.
4. Use one Wide or SuperWide tape to hold the splinted ear firmly to the side of the head as shown in the picture below. Use Wide tape if your baby is under 1 month of age. Use SuperWide tape if your baby is older than this, because the cartilage is stiffer and the ears are larger. The greater surface area of SuperWide tape also helps the tapes to stay in place as older babies have greasier skin, sweat more and are more active.
5. If you are using SuperWide tape, you might find it helpful to put an additional strip of Wide tape at the top of the ear to close off the groove between the ear and the side of the head (as shown in the picture) to discourage any ear tugging, for example, during teething.
6. Do not apply the adhesive tapes under tension or stretched; excessive tension may cause the delicate skin to shear or blister.
See examples below of fitting EarBuddies to treat Folded-Over Helical Rim.


-
Fitting Instructions for treating a Stick-Out Lobe
- Your pack contains two splints - one for each ear; there is no need to fit a splint to both ears if only one is misshapen or sticks out.
- The splints should be manipulated to the required shape. The splints need to fit snugly inside the helical rim, so checking and adapting the shape of each splint to fit the scaphal hollow of your baby's ears is essential.

See Figure A - Apply the splint to the scaphal hollow (A1), inside the rim (helix) (A2) of the ear. Ensure that the bottom of the splint holds the lobe in the correct position; the splint does not need to cover the whole of the lobe to effect a good correction, only the cartilage framework. This should still leave enough of the splint around the rim and upper part to also correct any prominence of the upper part of the ear. Hold the splint in position.

See Figure B - Remove one narrow tape strip from its backing. Starting from the back of the ear at the middle of its curve (position B1), stick it down over the skin and the splint so that the rim of the ear is rolled over the splint. Apply the second tape in position B3 - starting from the back of the ear, stick the tape over the skin and the splint. Affix another tape in position B4 in the same way. You can apply further narrow tapes along the length of the splint to hold the splint in place if you wish.

When the splint is held in place with the narrow tapes, grasp the central portion of the ear between your finger and thumb, and gently push the splinted earlobe inwards to exaggerate the correction.
Step 6 - Use Wide or SuperWide tape to hold the ear to the side of the head.
- Open the pack containing the Wide or SuperWide adhesive tapes.
- If using the SuperWide Tapes, you may wish to shorten them by up to 3 cm. Although shortening the tapes will give less adhesion, it will make them less conspicuous. You may be able to cut the excess SuperWide tape ends into narrow tapes to hold the splint in place next time you change the tapes.
3. Rounding the tape ends with scissors before you remove them from their backing and apply them can help to prevent the edges from lifting and improve their appearance.
4. Use one Wide or SuperWide tape to hold the Upper Pole of the ear firmly to the side of the head as shown in the picture. Use another strip of Wide or SuperWide tape to hold the splinted lobe in position against the side of the head. Use Wide tape if your baby is under 1 month of age. Use SuperWide tape if your baby is older than this, because the cartilage is stiffer and the ears are larger. The greater surface area of SuperWide tape also helps the tapes to stay in place as older babies have greasier skin, sweat more and are more active.
5. If your baby is older than 1 month, you might find it helpful to put an additional strip of Wide tape at the top of the ear to close off the groove between the ear and the side of the head (as shown in the picture) to discourage any ear tugging, for example, during teething.
6. Do not apply the adhesive tapes under tension or stretched; excessive tension may cause the delicate skin to shear or blister.

See examples below of fitting EarBuddies to treat Stick-Out Lobe.


-
Fitting Instructions for treating Conchal Crus
When fitting for Conchal Crus you may also need small, clean cotton wool balls.
We would always recommend that fitting EarBuddies to treat Conchal Crus is carried out by a Professional Fitter, but in line with our founding principle that EarBuddies should be available to all, we have provided fitting instructions here nonetheless.Conchal Crus presents in various different ways, and often appears in conjunction with other conditions. In fitting to treat Conchal Crus, the main objective is to manipulate the splint to comfortably fit baby's conchal bowl, so that when pressure is applied to the splint by the adhesive tape, the crus or bulge is pushed in.

Manipulate the splint into a heart shape, to fit baby’s conchal bowl, and position the splint in place. Before you apply the wide tapes, you can check that you have correctly manipulated the splint by applying light pressure to the splint with your finger, in the same way that the adhesive tapes will; if this appears to temporarily correct the problem whilst you hold your finger in place, then this is the correction that will be permanently made once the splintage period is complete.

If light pressure with your thumb does not give the desired result, then make further adjustments to the splint.
If necessary, in order to deepen the conchal bowl, two splints can be taped together using narrow tape. Alternatively, a small, clean cotton wool ball can also be added to exert additional pressure on the splint - ensure this cotton wool exerts pressure on the Conchal Bowl ONLY, and not on the other cartilage folds of the ear (see picture).


If other deformities are also present, such as a Rim Kink or Folded-Over Helical Rim, please see their separate fitting instructions and splint these conditions accordingly at the same time as the Conchal Crus. Please note you may need to buy additional splints to treat unusual combination deformities.
When you change the tapes, reassess the shape of the splint. As the shape of the conchal bowl changes, and baby’s ear naturally grows, you may need to slightly expand the heart-shaped splint accordingly.
WARNING - DO NOT to let the splint enter the ear canal. Curl the end of the splint so that it will not fit into the ear canal.
Step 6 - Use SuperWide tape to hold the ear to the side of the head
- Open the pack containing the SuperWide adhesive tapes.
- You may wish to shorten the SuperWide Tapes by up to 3 cm. Although shortening the tapes will give less adhesion, it will make them less conspicuous. You may be able to cut the excess SuperWide tape ends into narrow tapes to hold the splint in place next time you change the tapes.
Click to see more

3. Rounding the tape ends with scissors before you remove them from their backing and apply them can help to prevent the edges from lifting and improve their appearance.
4. Use SuperWide tape to hold the splint firmly in place in the conchal bowl. Ideally the tape should be as low down as possible to reduce the risk of damaging the cartilage folds of the helix and anti-helix, whilst at the same time applying pressure on the splint in the conchal bowl.
5. Do not apply the adhesive tapes under tension or stretched; excessive tension may cause the delicate skin to shear or blister.
See 6 examples below of fitting EarBuddies to treat Conchal Crus.


That's it! The fiddly bit is done. If the splint is correctly fitted, the ear should now have a greatly improved shape and position beneath the tapes. Once the cartilage hardens in this new position, you should achieve permanent correction.

Step 7 - Headwear
EarBuddies headwear is designed to keep the splints from prying eyes, to avoid the questions that splinting can attract. It can also support the correction and keep baby's inquisitive fingers away from the ears, but if you don't want your baby to wear a hat, then that's fine. Note, you should always check that any headwear is not making baby too warm.
We strongly advise against letting your baby wear headwear at night, as this can lead to overheating, and even cot death.
Step 8 - Remove the adhesive tapes
It is possible to remove the adhesive tapes using baby soap and water, but most parents prefer Adhesive Remover wipes. Appeel is the preferred option, as it is alcohol-free, sting-free and formulated for sensitive skin. We also supply Zoff which is cheaper, but contains alcohol.
- Appeel is designed to permeate the breathable Adhesive Tapes, creating a layer of silicone, allowing the adhesives tapes to fall away easily.
- Tear sachet to open and fold the wipe into a long rectangle.
- One section at a time, hold the Appeel wipe firmly on top of the adhesive tapes to be removed; it doesn't matter if the wipe directly touches the skin, as Appeel is formulated for the most sensitive skin.
- Allow the adhesive remover to soak in for 30-60 seconds.
- Gently lift off the tapes without pulling at the skin.
- Use the wipe to remove any remaining adhesive residue.
- Appeel rapidly evaporates from the skin surface. Once dry, it will not affect the adhesion of the fresh tapes.

Step 9 - Apply Medihoney® (optional)

- If your baby's skin becomes inflamed during splintage, Medihoney Barrier Cream will help restore the skin's barrier properties, moisture and pH levels. Click here for more information on Medihoney
- Medihoney should be applied to clean, dry skin using clean hands.
- Apply a pea-sized amount to all areas that appear inflamed; a little goes a long way.
- Leave Medihoney to soothe the skin (with the adhesive tapes off) for as long as it takes for the inflammation to settle (reapply Medihoney after bathing).
- Once the skin has settled, ensure the area is clean and dry before continuing with splintage; adhesive tape will not stick to Medihoney Barrier Cream.
- We would recommend applying Cavilon Barrier Film to the area at this point to protect against any future inflammation during splintage (see Step 3).
Once the splints are fitted...
Once the splints are in place, it is important that the ears do not get wet as this may reduce adhesion and encourage inflammation. It is best to keep baby clean with a damp flannel, and to wash baby’s head/hair only when you change the tapes.
If possible, try to keep the splints and tapes in place for two weeks at a time. Change the tapes if they are wet or are no longer doing their job, but not simply because they look a little dog-eared and grubby. By the first time you do this, you should see the beginnings of what can be achieved. If EarBuddies are fitted within the first week or so after birth, you can usually make a single tape application do the trick, but in babies older than two to three weeks, you will normally have to change the tapes at least once.
Inspect your baby’s ears (with tapes in place) each day to make sure that they are not becoming inflamed. Because very young babies sweat very little, the tape tends to stick better and for longer than in older babies, and if your baby is newborn, you may not need to change the tape at all. As your baby gets older, it is likely that the tapes will work loose more easily, as baby sweats more and is more active, and tapes may need changing more often.
When changing the adhesive tapes, and prior to bathing, remember to shave any hair that has grown since you last fitted the tapes to prevent new hair growth prickling. Don't forget to take photos to record the progress.
Additional Adhesive Tape Supplies can be ordered from our online shop if necessary.
WARNING
Your EarBuddies kit contains medical grade plastics, inert metals and hypoallergenic adhesive tape which should not harm your baby’s delicate skin. The device should not be used if the skin of your baby’s ear is broken. Should redness or other signs of irritation persist, consult a physician. The device is strictly for external use only, and no attempt should be made to insert the device into the ear canal, nor internally elsewhere.
EarBuddies will improve the majority of simple problems of shape, contour and position of the external ear. However, they cannot replace missing tissue or guarantee success in all cases. Specialist fitting is usually required for children who will need hearing aids or have microtia.
Record your progress!
Don’t forget take photos before and during splintage to record your progress. When splintage is complete, we would love to hear your success story. You could win £50 in Amazon Vouchers! All you need to do is write a brief outline of your EarBuddies success story, then send it with before and after pictures to earofthemonth@earbuddies.com.